Wednesday 3 September 2014

Delicious Lemon Meringue Cupcakes

When life gives you lemons … 

I’m sure you have heard it before, when life gives you lemons … (insert witty comment) and in my case its: bake lemon meringue cupcakes. I have been wanting to try these out for a while but didn’t really think my skill level was that high, but after making them on the weekend I realised they are actually quite simple to make and a lot of fun to assemble.


Step One: The Cupcakes

This was the easy part. I decided to try a different recipe than my normal basic vanilla cupcake recipe and I stumbled upon Martha Stewart’sLemon Meringue Cupcakes recipe. I have started to use buttermilk in a lot of my recipes as I feel it gives the cupcake more or a richer smoother taste without being dense and heavy. So I was quite keen to try this out. However I didn’t want the cupcakes to be lemon flavour as I figured the lemon butter would take care of that and I didn’t want to overpower it. So I simply skipped the lemon zest and lemon juice. I didn’t need to add anything else to it, the mixture was a great consistency without it. They came out looking beautiful and golden, rose just a little and smelt sooooo amazing!

See ... beautiful and golden

Step Two: Lemon Butter

I have never made Lemon Butter before, I know, crazy right! It such a classic thing to make. I looked in my Country Women’s Association (CWA) book hoping to find a simple classic recipe, but didn’t quite find what I was looking for. For those of you that don’t know, CWA books are the bomb! They have hundreds of recipes in their books and they are always simple and tasty. Kinda like the recipes your Mum or Grandma would make. So I was a little surprised and disappointed that I didn’t find a good lemon butter recipe. Nonetheless I found this one here on Frills in the Hills. I think the fact that it is the blog author’s nans recipe just seemed to make it a little more authentic to me. Oh and I definitely didn’t want to make an ‘easy microwave’ recipe. To me that isn’t traditional and it’s cheating. Kinda like using packet mix cupcakes instead of starting from scratch. Anyway, we won’t get into that debate!
The recipe says you need a candy thermometer, unfortunately I don’t have one of them, but I do have a meat thermometer! Haha so I just used that instead.


The highest temp is 200, so I just guessed when it hit the 230 degrees. My lemon butter turned out pretty good, only it seemed to have little white flecks in it, which I think was the zest. My grater only has 2 different grater types on it, so next time I will make sure I have a proper zester. The lemon butter was delicious though, zesty bits and all!


Step Three: Meringue

I was a little anxious making the meringue, it just always seems like such a daunting thing to do, getting the whites to the right consistency without over doing it. Its only been a week but I already cant remember the recipe I used! But I do remember the recipe saying it would make 8 cups, that seemed like enough for a dozen cupcakes, it certainly was! I don’t have a stand mixer yet, just a simple hand held kitchen aid mixer. So I didn’t use a whisk attachment like was requested, just the standard beaters. However it still turn out perfectly. Getting it into the piping bag was fun though!


Step Four: Putting it all together

So the last and final step was to put all of this together. I used a cupcake corer to cut out a whole in the middle of the cupcake. This was when I had my first taste of the cupcakes, eating the core centre that I pulled out and it was soooo good, I couldn't wait to eat the whole thing.


So I cored the cupcakes then spooned a few teaspoons of the lemon butter into the whole, filling it to the top, being careful not to over fill it.


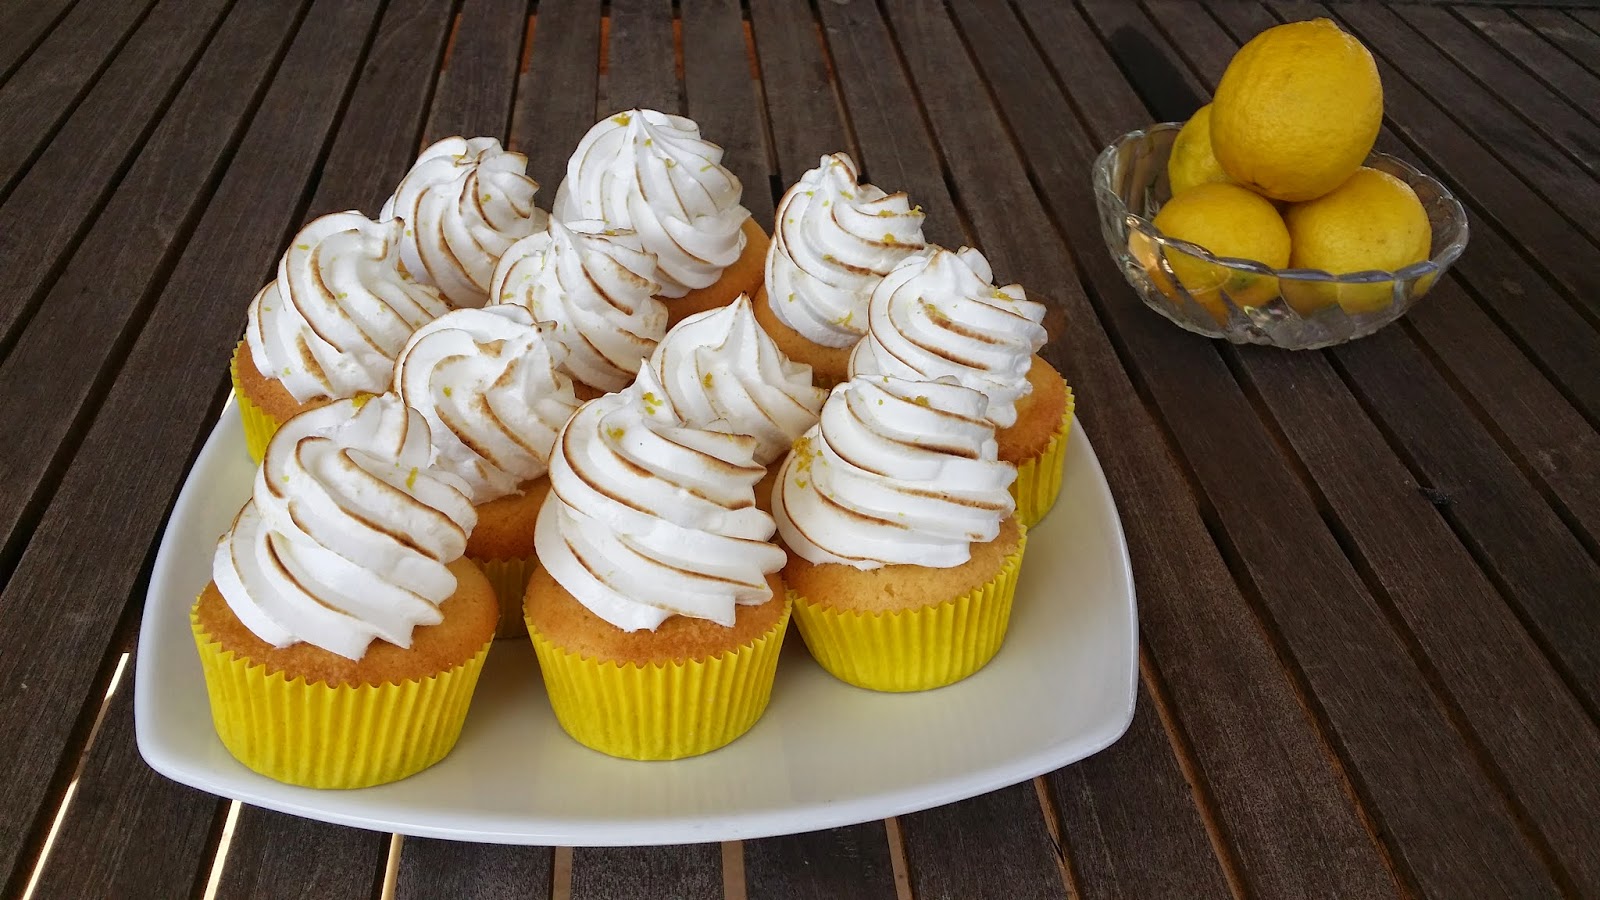
Then I filled my piping bag with meringue, and used a large start tip and piped very high swirls on the cupcake, ensuring I covered any evidence of the lemon butter hidden underneath. Then the fun bit, using the blow torch!


I have only ever used a mini blow torch once before when I made crème brulee and it was so much fun! I know that sounds sad, but it’s just cool, to see the pristine white meringue instantly turn golden and brown on the outside Once I had my fun with the blow torch I sprinkled a bit of lemon zest on the top and wallah! Lemon Meringue Cupcakes are finito!


Tuesday 19 August 2014

Chocolate cupcakes: Sugar free, Gluten free and Keto & Paleo friendly!

It's official! I have successfully made chocolate cupcakes that are not only gluten free and sugar free but also Keto and Paleo friendly! And best of all, they taste deliciously good and I can eat them guilt free! Amazing! 

I was at the local vet a few weeks ago and happened to see an advertisement up for RSPCA Cupcake Day, you can get more info here. Then I was perusing through the recipe section and came across Pete Evans' recipe for Chocolate Cupcakes that was Gluten free and Paleo friendly. Perfect! You can find the full recipe here.  

My boyfriend is gluten intolerant so I'm always on the look out for gluten free cupcakes or any other gluten free baking ideas. And for the last few months I have been following a strcit Keto diet. If your not sure what Keto is dont worry neither did I until I started it, but its basically a low carb diet with no sugar. I know, I know your probably thinking, but how? she always bakes yummy sweet things. One of the perks of the diet is to have one 'cheat night' a week, so I usually save my special treats for that night or I do what I have been doing lately, finding alternate sugar free versions of my normal treats. This new style of eating has certainly been an eye opener for me, there are still so many yummy things I can create that are a lot healthier for me than the usual sugary sweets I would go for. Nonetheless I still love a delicious red velvet cupcake smothered in fluffy buttercream frosting :) 

Anyway, back to the cupcakes! So these are Paleo friendly, but they still have sugar in them, so to make them Keto friendly I had to sub that out for something. Earlier in the year I went to the Cake Bake and Sweets Show in Sydney and discovered Natvia. Its basically a natural sweetener and is very useful in baking, both because it tastes good and it also has a 1:1 ratio to sugar which makes things handy. So there any many sweeteners out there and I have barely scratched the surface with them, but this is the one I have had the most experience and success with so far. If you want to find out more info you can read about it here


So I replaced the 190g of honey with 150g of Natvia. I also used almond milk, not coconut milk. As the frosting was made with Coconut Oil I didn't want to overload the coconut flavour so opted for Almond Milk instead and I also happened to have some leftover in the fridge that I needed to use. 


I followed the recipe exactly for everything else, my mixture ended up giving me 21 cupcakes which was great! A lot more then the prescribed 12. 

When I pulled them out of the oven they had a 'biscuit top' (my boyfriends term) look to them. But to be honest, I wasn't concerned about how they look, I just wanted them to taste good and they were going to be covered in frosting anyway :) 


So while they cooled I started on the frosting. The recipe calls for 500g of coconut oil, this seemed like an exuberant amount to me, so I just started with 300g, then figured I could add more later if need be. I did 40g of Cocoa powder instead of the 80g, but did a little extra cream. I just used normal cream not coconut cream. Firstly as I had normal cream in the fridge to use and I didnt want to open up a 300ml can of coconut cream only for 2 tablespoons and secondly, I again didnt want to overload the coconut flavour. 


The recipe said put all the ingredients in a food processor and mix it together until smooth. I unfortunately don't have a food processor at the moment (I must really look at getting one) so I just put it all into the blender and blended it together. I was really hesitant with the frosting, I just couldn't see how it was going to work out, with no powdery substance i.e. no icing sugar and so much oil. Anyway I blended it in spurts and scraped the sides and blended again and after a few minutes it becomes lusciously smooth and decadent, very much like ganache. I didn't look at the picture, so wasn't really sure how it was meant to turn out, I only knew that I had to be able to pipe it. So I poured it into a bowl and put it in the fridge to set for a bit to firm up to make it pipeable and after maybe an hour it came out perfectly pipeable and tasted like eating Bounty flavoured ganache. 


Due to my eating restrictions at the moment, I just frosted a few for us to eat over the next few days and then put the rest in the freezer. 

The cupcakes tasted great! They weren't dry or dense like gluten free cupcakes sometimes turn out, almond meal is great for that and the choc coconut frosting on top just gave it that added richness and variation in flavour. And best of all I can eat them guilt free knowing they are sugar free and my boyfriend can also enjoy them as they are gluten free. 


So here is the recipe:


Chocolate Cupcakes (gluten free and sugar free)

Adapted from Pete Evans' recipe found here


(Makes approx 20) 

Ingredients

Cupcakes

300 g almond meal
5 tablespoons raw cacao powder
2 tablespoons baking powder
3 organic free-range eggs
100 ml coconut oil, melted
160 ml almond milk
150 g Natvia sweetener

Chocolate and Coconut Frosting

300g coconut oil (softened, not solid)
100g Natvia sweetener
40g raw cacao powder, sifted
2 tablespoons cream
Shredded coconut to garnish

Directions

Preheat the oven to 180°C.
Line a 12 cup muffin pan with pattie liners.
In a large bowl mix the almond meal, cacao powder and baking powder.
In another bowl, whisk the egg, coconut oil, almond/coconut milk and honey until smooth.
Gently fold the egg mixture into the dry ingredients and mix to form a batter.
Spoon the batter into prepared muffin cups, filling each to three-quarters full.
Bake for 20 minutes or until cooked through. To check if the cupcakes are cooked, insert a toothpick into the centre and if it comes out clean, the cupcakes are ready.
Allow the cupcakes to cool completely on a wire rack before frosting.

To make the chocolate frosting

Combine all the ingredients in a blender or food processor and blend until smooth. Place in a bowl and set in the fridge for an hour, or until frosting becomes firm enough to pipe. 
Pipe the frosting onto the cooled cupcakes and sprinkle with shredded coconut to garnish.

Have you ever made paleo or keto friendly cupcakes or simply used a sweetener instead of sugar? I would love to hear about it :)


Sunday 27 July 2014

Kettlebell cake!

Last week was my brother’s birthday and so he put forth a special request for this birthday cake, he wanted it in the shape of a kettlebell and for it to be piñata style so that when you cut it open smarties and maltesers come gushing out.  Easy right? Haha
At first I had thought I would just bake a Giant Cupcake using my silicone mould then shape it accordingly into the kettlebell shape and simply cut out a ‘hole’ between the handle and the top of the weight. But then I thought the handle won’t be too sturdy as it will only be made from cake. My next thought was to just make the actual shape of the kettlebell weight from the cake and find something else to make the handle from. Then another thought, there must be ball shaped cake tins right? Of course! So I sourced the ball cake tins and used that instead.


That covered the weight part of the kettlebell but I had no idea how I was going to do the handle part. I google it to hopefully gain some inspiration but it seems most people used rice krispy treats or something like that, wasn’t really something I was too keen to try, so I just figured I would make it from fondant.

So I consulted my cookbooks shelf and pulled out this book.


And found this recipe …


I had all the ingredients in the cupboard and it looked relatively easy, and it was! It turned out really well, the tins were perfect, they rose slightly, but I was able to cut the tops of to make them flat in order to put them together to make the ball shape of the weight.


I also cut the bottom to make that a little flat so that it was more sturdy and kettlebells have flat bottoms too. Then I took a small bit off the front too as that was where I was going to put the weight number, or in this case, my brothers age.
So once all put together, I covered it in buttercream frosting, blue as was requested by the birthday boy.


Then onto the fondant handle.

I split my fondant up into 3 parts, 2 for the side bits of the handle and 1 slightly longer part for the top of the handle. Then I simply rolled them into thick sausages. Oh I almost forgot, I coloured the fondant blue first of course, to match the frosting colour.


Once each piece was rolled and to the size that matched my ‘weight’ I slid a bit of wooden dowel (kebab sticks) into each bit as that was how I was going to stick it into the cake. My local kitchen supplies shop had recommended getting cake wire and using that, but they were out of stock and the place they recommended closed before I could get to it, so I just used the kebab sticks instead. So I shoved them in to each piece, then gently molded the two top bit of the handle to the two side bits of the handle and laid it down flat to set overnight. I really should have done this on the weekend and given it more time to set, but I didn’t quite plan that far ahead :(


Looking back in hindsight it might have been better to have just done one long roll of fondant, then curved/bent it into the handle shape instead of doing the three parts then having to mold them back together. At least I will know for next time J
So I coloured a bit of the fondant black and used stencils to cut out the numbers 3 and 4 and stuck them on the flat part at the front. Then I had a little bit left over so I made a few little mini weights and dumbbells to have next to the cake.


Cakes aren’t really my speciality, but this once seemed to turn out pretty good. I definitely need more practise with working with fondant though, but nonetheless, it was fun :)


Friday 25 July 2014

Neapolitan Icecream Sundae Cupcakes


Last month my work hosted the Biggest Morning Tea to help raise well needed funds for the Cancer Council. For more info about the Cancer Council and their research or to donate head their website here. Not only was this a great event to allow us to raise money for much needed cancer research but it also gave me an excuse to bake! (Not that I really need an excuse).

So even though its the middle of winter, doesn't mean its too cold for ice-cream ...ice-cream cupcakes that is! Well ... not really icecream cucpcakes, more iceceam inspired cupcakes. I had orginally wanted to try doing a rainbow polka dot cake or rainbow polka dot cupcakes, but was a bit short for time so ended up using half the rainbow instead and doing neapolitan.

I started off using my basic vanilla cupcake recipe. Once the mixture was complete I split it into three seperate bowls to make the 3 different flavours and colours. I simply added cocoa powder for the chocolate, pink gel colouring for the pink, also with a hint of strawberry essence then left the third part of the mixture as was for the vanilla.


Then I layered them when I put them into the cupcake trays. I couldn't remember the proper order of the icecream and google gave me a few different answers so I had chocolate, strawberry then vanilla in my head, so thats what I did!


They turned out quite well, with not too much of the strawberry showing from under the vanilla.


Next was onto the frosting. Again I followed with the Neapolitan theme, but I also wanted to add the sundae element to the cupcake. I used a basic buttercream frosting and again added cocoa powder for the chocolate, strawberry essence and pink gel colouring for the strawberry and left the mixture the same for the vanilla.

So following the same layers as the cupcake, my first layer or frosting was chocolate.


Next was strawberry 


And then on top of that I finished with the vanilla


At this stage I realised I had run out of piping bags! I only had 2 in my cupboard but of course I needed 3, so for the vanilla I had to resort to using a zip lock bag, that was a bit of an interesting experience, but desperate times call for desperate measures! Nonetheless it did the job :)


Next was to add some chocoloate sauce. I melted some plain Cadbury milk chocolate melts, put it into a zip lock bag, (a proper use for a zip lock bag) snipped the corner then lightly drizzled chocolate over the cupcake, the same way you would with chocolate sauce on your ice cream. 


The final 2 steps were to ad a jaffa on the top and a small piece of wafer to the side, and there you have it, Neapolitan Icecream Sundae cupcakes!


There are many different ways you can theme these cupcakes to be like a sundae, you can add strawberry sauce instead of chocolate, or add sprinkles etc Tell me how you would make your Sundae cupcakes, I would love to know!


Oh and you may notice in some of the pictures, one of my jaffas on top of the cupcakes is pink! As these cupcakes are so tall, I couldnt fit them into my normal cupcake carrier so I had to squeeze them into tall plastic containers instead, only I didnt have enough room for the last one, so it went into the frige as is. Then when I pulled it out the next morning it had turned pink! Neat! Just a sneaky tip for you if ever need pink balls as decorations :)


Sunday 6 July 2014

White Chocolate Mud Cupcakes with Salted Caramel Frosting

So with less than a week until I move house, an old work mate messages me asking for a favour. His wife, 8 months pregnant is having major cravings for ... yep, you guessed it, cupcakes! In desperation he so kindly asked if I would be able to bake for her to help satisfy his wife's mad cravings and help put him at ease. And of course, before even thinking: how am I going to have time for this? where are my piping tips? which box are my sprinkles in? I said I would be delighted to bake for her.
The flavours requested were White Chocolate and Salted Caramel. Two flavours I have never tried.

As my recipe books are all packed, I did the modern day thing and jumped onto google. Unfortunately it was a little disappointing at first, upon searching for white choc mud cake cupcakes, all that seemed to come up was cakes! Normally I would be fine with this, I would happily use a cake recipe and adapt it slightly if needed to suit cupcakes, however time was not on my side and so I wanted something quick an easy that I knew would definitely work. That's when I stumbled upon Tea for Six and her recipe for White Chocolate Mud Cupcakes. Simple, easy and makes a dozen ... Perfect!

Pink cupcake liners as my friends wife is having a girl

This recipe was super easy which was such a blessing and no kitchen mixer required, its all done by hand! Melt a few ingredients in a saucepan, then add to the dry ingredients.


Amazing, easy, fast and no mess!


The only adjustment I made was the cooking time. Her recipe said bake for 30 minutes or until cooked. I know every oven is different, but after 15 minutes mine were beautiful and golden and perfect, so out they came ...


Now onto the frosting. Again I googled recipes for salted caramel frosting, and surprisingly enough almost all the recipes I found were making it from scratch! Normally that would be a good thing, but lacking in time for precision I wanted a 'cheats' caramel. Luckily I remembered watching a video on My Cupcake Addiction recently for cheats caramel frosting with only 3 ingredients, perfect! exactly what I was after.


My caramel frosting ended up looking super delish, I simply added some salt to turn it into salted caramel frosting, easy right? of course!

When it came to piping my cupcakes, I got a little eager, my recipe was a little runny. I should have put the caramel frosting in the fridge to set and firm up a little, so that when it piped it held its shape. Unfortunately I didnt, so when I piped my frosting, it 'flopped' haha but thats ok, I tilted the cupcakes and allowed it to 'flop' and cover the whole cupcake and it left a pretty pattern from my piping tip. Phew!


The finished product


Unfortunately I didnt get to taste the cupcakes as I only made a dozen, but hopefully there were delish!

Have you ever had a recipe 'flop' or not turn out the way you planned?